Support columns appear in thousands of living rooms, often serving a critical structural role, but they rarely look good doing it. These vertical obstructions interrupt sight lines, break up furniture arrangements, and make decorating feel like an obstacle course. Homeowners inherit them with open floor plans or discover them after removing non-load-bearing walls. The good news: that pillar doesn’t have to feel like an architectural mistake. With a few well-planned changes, it can become a functional focal point or blend seamlessly into the room’s design.
Table of Contents
ToggleKey Takeaways
- Built-in shelving and cabinetry transform a living room pillar from an eyesore into functional storage and display space while maintaining the structural integrity of load-bearing columns.
- Strategic furniture placement like flanking the pillar with matching pieces or positioning seating perpendicular to it makes the column feel intentional rather than disruptive without requiring permanent modifications.
- Vertical gardens, wall-mounted planters, or natural rope wrapping soften the pillar’s hard architectural lines and turn it into a living feature that adds visual interest and improves air quality.
- Mirror tiles, wood paneling, or patterned wallpaper change how the pillar interacts with the room—mirrors visually erase its mass while paneling adds warmth and character to decorating schemes.
- Integrated LED lighting or mounted artwork transform the pillar into a functional focal point that enhances the room’s ambiance and makes the column feel like an intentional design element rather than a structural necessity.
Why Living Room Pillars Are Both a Challenge and an Opportunity
Most interior pillars fall into one of two categories: load-bearing columns required by the structure, or decorative posts leftover from old construction. If it’s load-bearing, it’s not going anywhere, removing or modifying it requires an engineer’s stamp and potentially a steel beam replacement. That’s expensive and disruptive.
But structural necessity doesn’t mean visual liability. The pillar already divides the space, use it. It naturally creates zones without the need for additional partitions. A column between a seating area and dining nook, for example, reinforces the boundary without blocking light or airflow.
The challenge is that pillars are often oddly placed, protruding just enough to disrupt furniture flow but not enough to anchor a full room divider. They also vary in size. A 6-inch steel column wrapped in drywall behaves differently than a 12-inch masonry post. Measure the pillar’s dimensions and note what’s nearby, windows, outlets, HVAC vents, before planning any treatment.
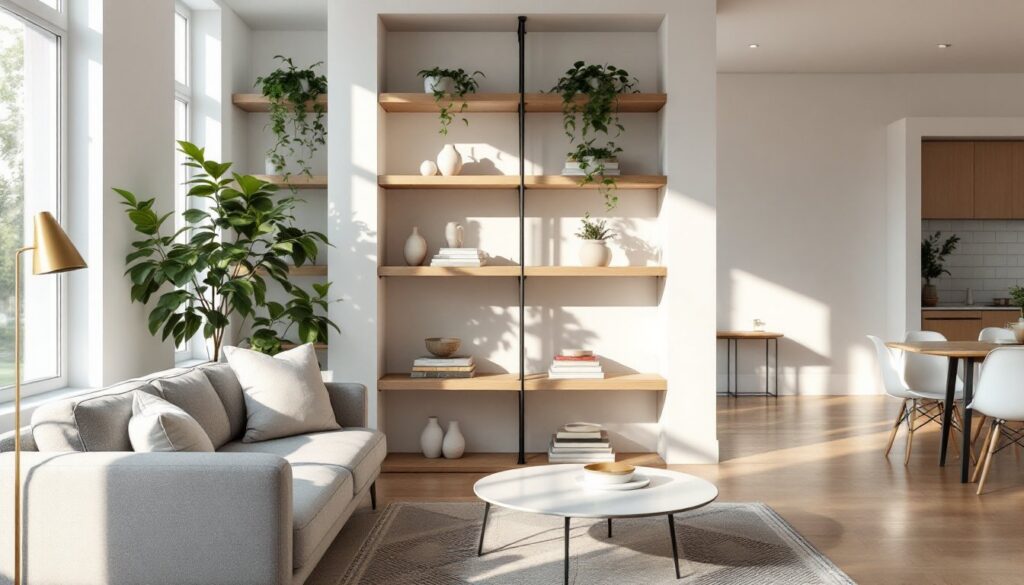
Wrap It in Custom Built-In Shelving or Cabinetry
Built-ins turn the pillar into storage, display space, or both. This approach works best when the column sits near a wall or between two functional zones.
Materials and construction: Use 3/4-inch plywood or MDF for the cabinet boxes. Frame around the pillar with a combination of vertical supports and horizontal shelves. If the pillar is load-bearing, don’t attach anything that could compromise its integrity, consult local building codes (often governed by the International Residential Code, or IRC) if in doubt. Most cosmetic treatments are fine, but drilling into steel or removing material isn’t.
Design options include:
- Floor-to-ceiling bookshelves that flank the column and incorporate it into the center
- A media console that wraps three sides, hiding the pillar behind cabinetry and creating a TV niche
- Open shelving on one or two sides with floating brackets, keeping sight lines open while adding function
Finish with the same trim and paint as the rest of the room to make it look intentional. For homeowners expanding on decorating ideas and techniques throughout the home, built-ins offer a cohesive way to add custom storage without sacrificing square footage.
Safety note: Wear safety goggles and a dust mask when cutting MDF, it produces fine particulate that irritates lungs and eyes.
Disguise the Pillar with Strategic Furniture Placement
If construction isn’t in the budget, furniture can do the work. The goal is to make the pillar feel like part of the layout rather than an interruption.
Flank it with matching pieces: Place two identical bookcases, console tables, or accent chairs on either side of the column. This creates symmetry and draws the eye to the furniture rather than the post. The pillar becomes a natural divider between seating zones or between the living area and an entryway.
Use it as an anchor: Position a sofa or sectional perpendicular to the pillar, letting the column mark the end of the seating area. Add a floor lamp or tall plant on the other side to balance the visual weight. This works especially well in open-concept layouts where the pillar already signals a transition between spaces.
Incorporate it into a gallery wall: If the pillar is near a wall, extend artwork or framed photos across both surfaces. Use the same frame style and spacing to create continuity. The column becomes part of the display rather than a gap in it.
Furniture placement won’t make the pillar invisible, but it can make it feel deliberate. And unlike permanent modifications, it’s reversible, helpful for renters or anyone testing ideas before committing to construction. Top decorating ideas often rely on flexible arrangements that adapt as needs change.
Transform It into a Vertical Garden or Plant Display
Greenery softens hard architectural lines and adds life to a room. A pillar wrapped in plants becomes a living feature rather than a structural afterthought.
Vertical planters and wall-mounted systems: Attach modular wall planters or a vertical garden grid to one or more sides of the column. These systems typically mount with screws into studs or masonry anchors, depending on the pillar’s construction. Use a stud finder if the column is wrapped in drywall over steel or wood framing.
Plant selection matters:
- Pothos, philodendrons, and English ivy tolerate low light and cascade naturally
- Ferns and spider plants fill out quickly and handle average indoor humidity
- Succulents work if the pillar is near a window with strong light
For larger installations, consider a drip irrigation kit with a small reservoir at the base, this reduces maintenance and keeps water off floors. If drilling into the pillar isn’t an option, use freestanding plant stands arranged around the column instead.
Alternative approach: Wrap the pillar in natural rope (jute or sisal) secured with construction adhesive, then hang small potted plants from S-hooks. This adds texture and makes the column feel intentionally rustic. Design inspiration for plant-forward interiors is widely available at Decoist, which showcases creative uses of greenery in modern homes.
Safety note: Ensure any mounted hardware is rated for the weight of filled planters. Wet soil is heavier than it looks.
Use Mirrors, Paneling, or Wallpaper to Blend or Highlight
Surface treatments change how the pillar interacts with the room. Mirrors make it disappear. Paneling gives it character. Wallpaper turns it into a statement.
Mirrors: Apply mirror tiles or custom-cut mirror panels to two or three sides of the column. Use construction adhesive rated for mirrors (like Loctite PL 530) and avoid over-tightening mechanical fasteners, which can crack glass. Mirrors reflect light and views, visually erasing the pillar’s mass. This works best in smaller rooms where the column feels oversized.
Wood paneling: Shiplap, board-and-batten, or tongue-and-groove pine adds dimension and warmth. Attach 1×4 or 1×6 boards vertically or horizontally using a brad nailer and construction adhesive. Finish with semi-gloss paint or stain and polyurethane. This treatment pairs well with farmhouse or coastal interiors and makes the pillar feel like original millwork.
Wallpaper or peel-and-stick vinyl: Bold patterns, faux brick, or grasscloth can make the column a focal point. Measure carefully and use a straightedge and utility knife to trim excess. Peel-and-stick options (like those from Tempaper or RoomMates) are renter-friendly and forgiving for beginners. For subtle integration, match the pillar’s wallpaper to an accent wall nearby, as discussed in decorating ideas and strategies for unified room design.
Safety note: Use a respirator (not just a dust mask) when sanding or priming previously painted surfaces that may contain lead, especially in homes built before 1978.
Turn the Pillar into a Functional Feature with Lighting or Art
If the pillar can’t hide, make it useful. Lighting and artwork give it purpose beyond structure.
Integrated lighting: Install LED strip lights in a recessed channel running vertically along one or more sides. This creates ambient uplighting or downlighting and makes the column glow. Use a router with a straight bit to cut a shallow groove if working with wood cladding, or surface-mount an aluminum LED channel for a cleaner look. Wire to a dimmer switch for control. This approach is particularly effective in modern or minimalist interiors.
Alternatively, mount adjustable picture lights or swing-arm sconces to the pillar. These provide task lighting for nearby seating and make the column feel like part of the room’s lighting plan. Consult the National Electrical Code (NEC) or hire a licensed electrician if running new circuits, improper wiring is a fire hazard.
Art and sculpture: Treat the pillar as a pedestal. Mount a large canvas or framed print on one side, or use 3M Command strips for lighter pieces. For three-dimensional interest, attach a floating shelf and display sculpture, ceramics, or collectibles. Rotate items seasonally to keep the look fresh.
DIY finishing touches: Paint the column a bold accent color that contrasts with the walls, or use chalkboard paint to create a functional surface for notes and drawings, especially useful in homes with kids. Resources like HGTV offer additional project ideas for turning structural elements into design features. Combining these treatments with broader decorating ideas and tips helps unify the room.
Conclusion
A living room pillar doesn’t have to shrink the space or limit design options. Whether wrapped in built-ins, softened with greenery, disguised with mirrors, or turned into a functional feature, the column can serve the room instead of fighting it. Start by measuring the pillar and assessing its role in the structure. Then choose a treatment that fits the home’s style, budget, and skill level. The right approach makes the pillar look like it was always meant to be there.