Built-in electric fireplaces offer the ambiance of a traditional hearth without the venting requirements, ash cleanup, or installation hassles of gas or wood-burning units. They fit seamlessly into wall openings, custom cabinetry, or media centers, delivering instant heat and visual impact. Whether renovating a dated living room or adding a focal point to a small bedroom, built-in electric fireplaces combine function with design flexibility. This guide covers practical ideas for different rooms, surround options, and installation tips to help homeowners plan a project that looks custom without the cost of a full masonry rebuild.
Table of Contents
ToggleKey Takeaways
- Built-in electric fireplace ideas eliminate the need for venting, chimneys, or gas lines, making them ideal for condos, apartments, and homes where traditional fireplaces aren’t practical.
- A built-in electric fireplace requires only a standard 120V outlet and produces 4,500–5,000 BTUs, enough to supplement heat in rooms up to 400 square feet with minimal maintenance.
- Successful installations use heat-tolerant materials like porcelain tile, natural stone, or cement board, while avoiding vinyl and PVC trim that can’t handle temperatures above 200°F.
- Built-in electric fireplaces work in any room—living rooms (below-TV or floor-to-ceiling), bedrooms (foot-of-bed or accent wall), and small spaces (vertical or shallow 2×3 framing)—each with design flexibility.
- Proper electrical installation requires running 14/2 or 12/2 NM-B cable to a recessed outlet, following NEC standards, and securing permits if required in your jurisdiction.
- Finishing touches like a floating mantel, surround material selection, and adjustable flame brightness transform a built-in electric fireplace into a custom focal point that enhances any room’s ambiance and value.
Why Choose a Built-In Electric Fireplace?
Built-in electric fireplaces require only a standard 120V outlet (some larger models need 240V) and no chimney or gas line. That makes them ideal for condos, apartments, or homes where venting is impractical. Most units produce 4,500–5,000 BTUs, enough to supplement heat in rooms up to 400 square feet.
Unlike insert models that slide into existing openings, built-in units are designed to be framed into a wall cavity or surrounded by custom millwork. This approach creates a cleaner, more intentional look, think floor-to-ceiling tile surrounds, recessed niches, or integrated shelving.
Key advantages include:
- No permits in most jurisdictions (always verify local codes, especially for electrical work)
- Year-round usability, flame effect operates independently of the heater
- Low maintenance, no flue cleaning, no gas line inspections
- Adjustable flame brightness and color on many models, including multicolor LED options
Installation is straightforward for anyone comfortable framing a wall, running electrical cable, and finishing drywall. If the project involves opening a load-bearing wall or upgrading a service panel, hire a licensed electrician or contractor.
Living Room Built-In Electric Fireplace Designs
The living room is the most common spot for a built-in electric fireplace. Placement options include:
- Below-TV mounting: Frame the fireplace into the wall beneath a wall-mounted television. Keep the top of the firebox at least 12 inches below the TV to prevent heat from affecting electronics.
- Floor-to-ceiling feature wall: Surround the unit with stacked stone, large-format porcelain tile, or shiplap that runs from floor to ceiling. This draws the eye upward and anchors the room.
- Flanked by built-in shelving: Frame the fireplace with floor-to-ceiling cabinets or open shelves on both sides. Use 2×4 framing to create recesses for the firebox and shelving units, then finish with hardwood, MDF, or primed poplar trim.
When planning the opening, add 1/2 inch clearance on all sides of the firebox per manufacturer specs, this allows heat to escape and simplifies installation.
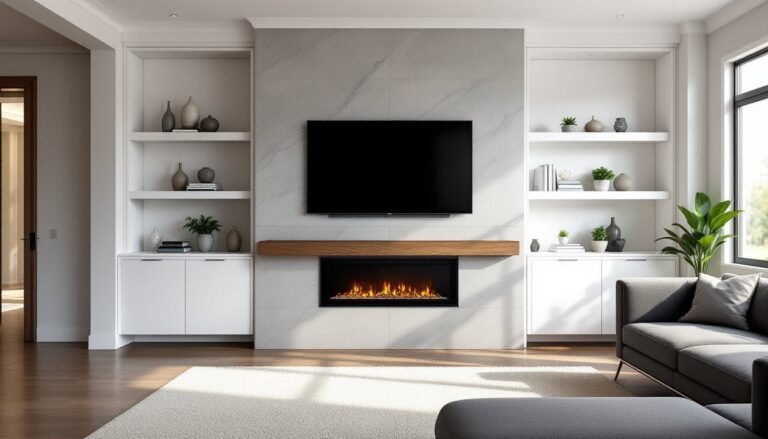
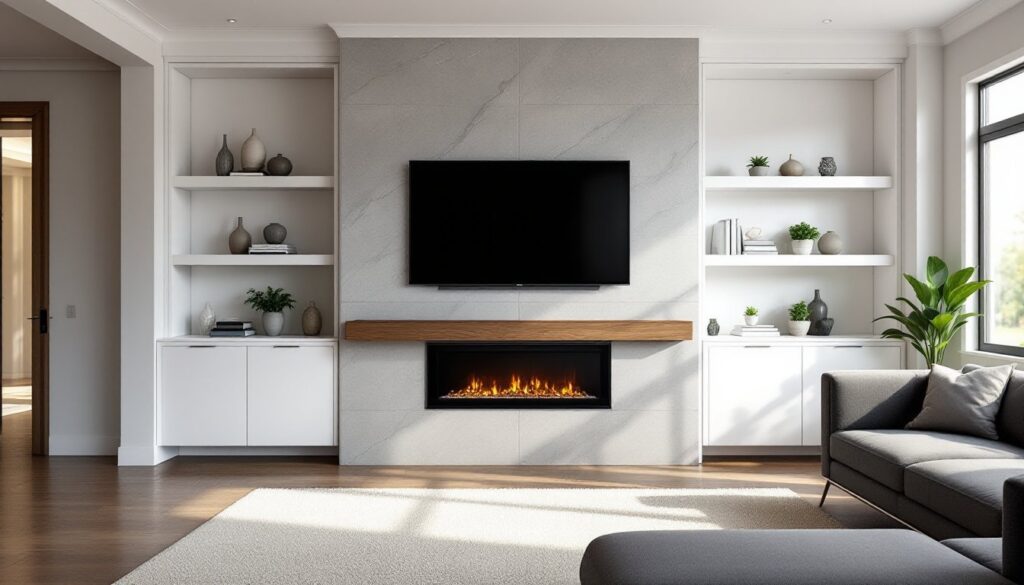
Creating a Modern Media Wall
A media wall integrates the electric fireplace, television, and storage into a single built-in unit. Start by framing a 2×4 stud wall (or furring out an existing wall) to accommodate the firebox depth, most units are 5–7 inches deep.
Run 14/2 or 12/2 NM-B cable (depending on amperage requirements) to a recessed outlet behind the firebox. If the TV will also mount on this wall, install a recessed electrical box and low-voltage pass-through for HDMI and power cables.
Finish the surround with materials that handle heat: porcelain tile, natural stone, or cement board painted with heat-resistant paint. Avoid vinyl, PVC trim, or any material rated below 200°F. Cap the top with a floating mantel made from solid hardwood or a steel angle iron bracket for an industrial look. Keep combustibles at least 6 inches above the firebox opening.
Built-in smart home integration allows some models to connect to voice assistants or smartphone apps for remote control.
Bedroom Built-In Electric Fireplace Ideas
A built-in electric fireplace adds a hotel-suite feel to a primary bedroom without the square footage loss of a freestanding unit. Common placements:
- Foot-of-bed wall: Center the fireplace on the wall opposite the bed. Frame it with symmetrical nightstands or built-in storage.
- Corner installation: Use an angled corner unit (less common but available) or frame a standard linear model into a corner niche with angled trim.
- Accent wall behind the headboard: Install a narrow linear fireplace into the wall behind the bed, this works best in larger bedrooms where the bed sits several feet from the wall.
Bedrooms benefit from models with adjustable flame brightness and a sleep timer. Many units include a remote or touch control to dim the flame effect without leaving bed.
For small bedrooms, keep the firebox width under 36 inches to avoid overwhelming the space. For larger primary suites, a 50–60 inch linear model creates a dramatic focal point. Surround options include shiplap painted in matte black, reclaimed wood planks, or a simple drywall finish with picture-frame molding.
Built-In Electric Fireplaces for Small Spaces
Small rooms, dens, home offices, or basement sitting areas, benefit from compact built-in designs. Look for units 30 inches wide or less with a shallow profile (under 6 inches deep).
Vertical installation works well in narrow spaces: mount a tall, narrow firebox between two windows or in a slim alcove. This uses vertical real estate without eating into floor space.
Another option: build a shallow bump-out wall using 2×3 studs instead of 2×4s. This reduces the depth of the built-in to about 3.5 inches (plus drywall and finish material), making it easier to fit into tight floor plans.
Skip the mantel in small rooms, it visually clutters the wall. Instead, finish the surround flush with the wall surface using tile or a painted drywall frame. For additional inspiration on compact built-in fireplace designs, homeowners can explore layouts that balance scale and function.
Surround Material and Finish Options
The surround defines the style of a built-in electric fireplace. Material choices depend on heat tolerance, budget, and skill level.
Porcelain or ceramic tile is the most durable option. Large-format tiles (12×24 inches or larger) minimize grout lines and create a modern look. Install over cement board using thinset mortar rated for heat. Seal grout lines with a penetrating sealer.
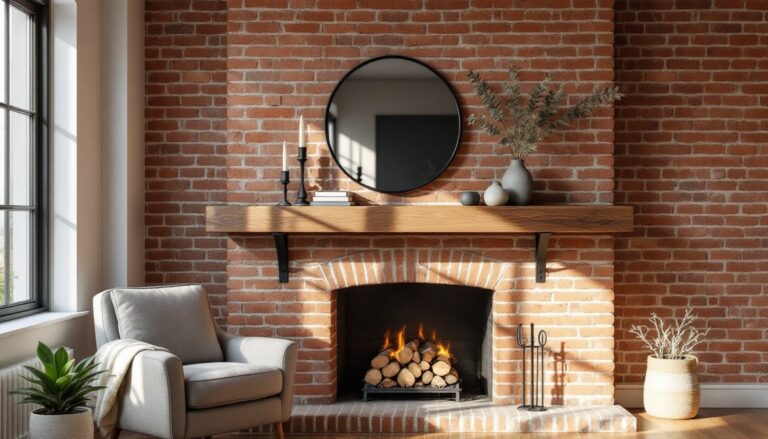
Natural stone, slate, marble, or stacked ledgestone, adds texture and works in traditional or rustic settings. Stone is heavy: use metal lath and mortar or a stone veneer system designed for interior walls. Expect to pay $8–$15 per square foot for materials, plus installation labor if hiring out.
Shiplap or tongue-and-groove paneling suits farmhouse or coastal styles. Use kiln-dried pine or poplar and keep boards at least 6 inches from the firebox opening. Finish with low-VOC paint or a clear polyurethane rated for heat.
Drywall with trim is the budget-friendly option. Frame the opening, finish with 1/2-inch drywall, then add picture-frame molding or a simple flat casing. Paint in a contrasting color (matte black, charcoal, or deep navy) to make the fireplace pop.
Metal panels, steel, copper, or blackened steel, create an industrial or contemporary look. Most metal suppliers can cut panels to size: attach using construction adhesive or concealed brackets.
For a gallery of built-in electric fireplace styles, review room-specific installations that highlight different surround treatments.
Installation Tips for Built-In Electric Fireplaces
Before framing, confirm the rough opening dimensions in the manufacturer’s installation manual. Most units specify exact height, width, and depth, plus required clearances to combustibles.
Framing the opening: Use 2×4 studs on 16-inch centers. Add a horizontal header across the top of the opening and a sill plate at the bottom. If the wall is load-bearing, consult a structural engineer or contractor, never cut studs without proper support.
Electrical rough-in: Run 14/2 NM-B cable (for 15-amp circuits) or 12/2 NM-B (for 20-amp circuits) from the breaker panel to a recessed outlet box behind the firebox. Position the outlet per the manual, usually centered 6–12 inches above the bottom of the opening. Install a GFCI outlet if the fireplace is in a bathroom or kitchen area. Electrical work must meet NEC (National Electrical Code) standards: pull permits if required in your jurisdiction.
Installing the firebox: Slide the unit into the framed opening. Most models include mounting flanges that screw directly to the studs. Check for level and plumb before securing. Connect the power cord to the recessed outlet.
Finishing: Install 1/2-inch cement board around the opening if using tile or stone. For drywall surrounds, finish seams with joint compound and sand smooth. Apply the surround material, then add trim or a mantel.
Safety check: Test the unit before closing up walls. Verify the heater operates, the flame effect functions, and there’s no smell of burning insulation (some new units emit a faint odor during the first few uses, this is normal).
PPE: Wear safety glasses when cutting lumber or tile, hearing protection when operating saws, and a dust mask during drywall sanding. Always shut off power at the breaker before working on electrical connections.
If the project involves upgrading the electrical panel or running new circuits through finished walls, hire a licensed electrician. Most jurisdictions require permits and inspections for electrical work.