Cream kitchen cabinets deliver the warmth of white with enough depth to hide wear and soften harsh overhead lighting. They’re forgiving on fingerprints, versatile across design styles, and surprisingly neutral when paired with bold backsplashes or dark countertops. Whether renovating a dated galley or refreshing builder-grade oak, cream cabinetry offers a middle ground that won’t feel trendy in three years. This guide covers color pairings, hardware finishes, backsplash choices, and practical maintenance tips to help homeowners confidently design or update their kitchen with cream cabinets.
Table of Contents
ToggleKey Takeaways
- Cream kitchen cabinets offer a timeless middle ground between stark white and beige, absorbing light for a softer ambiance while hiding fingerprints and wear better than pure white.
- Dark countertops like honed black granite or matte black quartz create dramatic contrast with cream cabinets, while neutral stones like Carrara marble blend seamlessly for a softer, layered look.
- Hardware finishes—brass, matte black, and polished nickel—should be chosen to match the cabinet’s undertone: warm brass for yellow-toned cream, matte black for modern contrast, and nickel for cool gray undertones.
- Cream kitchen cabinets work beautifully across design styles from modern farmhouse and coastal to transitional and Scandinavian, making them a safer investment for resale value than trendy color choices.
- Proper lighting at 2700K to 3000K (warm white) and medium to dark flooring tones ground cream cabinets while preventing them from appearing washed out.
- Routine maintenance with diluted dish soap, a range hood vented outside, and annual touch-ups or rewaxing preserves the finish and prevents yellowing from heat and grease exposure.
Why Cream Cabinets Are a Timeless Choice for Modern Kitchens
Cream sits between stark white and beige, offering enough contrast against trim and ceilings without the clinical feel of pure white. This balance makes it adaptable to both traditional and contemporary spaces.
Unlike bright white, cream tones absorb some light rather than reflecting it harshly, which softens the overall ambiance in kitchens with limited natural light or north-facing windows. The slight yellow or gray undertone (depending on the specific shade) adds warmth without reading as dated.
From a practical standpoint, cream hides minor scuffs and dust better than white. Cabinets near stovetops or high-traffic zones stay cleaner-looking longer, reducing the frequency of touch-up cleaning. Paint and laminate finishes in cream also tend to age more gracefully than stark whites, which can yellow over time from heat and cooking oils.
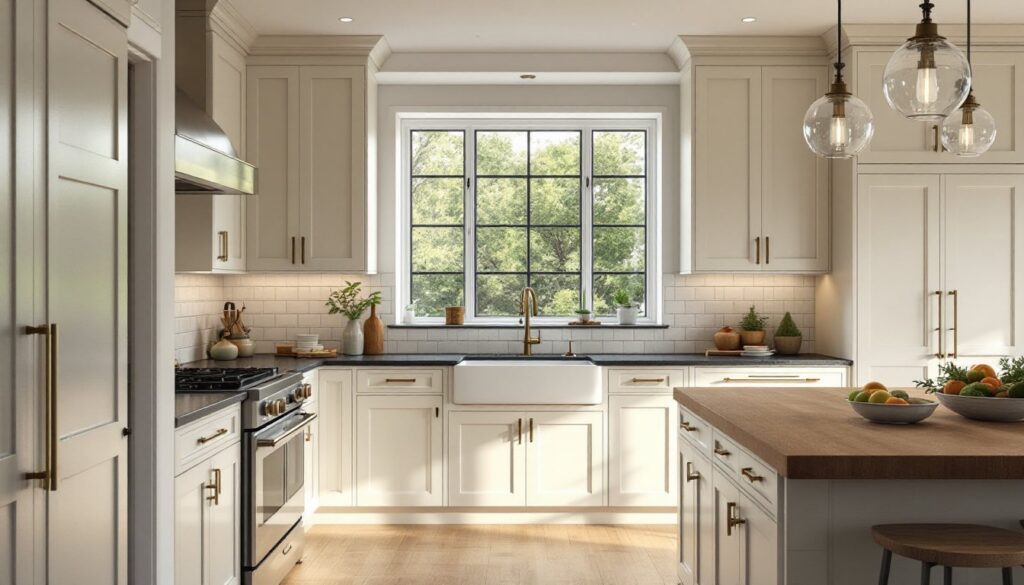
Cream cabinets work across multiple decades of home styles, whether the house is a 1920s bungalow, a 1980s colonial, or a 2020s build. They pair equally well with farmhouse sinks, slab-front modern doors, or raised-panel traditional profiles. This flexibility makes them a safer investment for resale value compared to bold color choices or ultra-trendy finishes.
Best Color Pairings and Countertop Options for Cream Cabinets
Cream cabinets provide a neutral canvas that allows countertops and wall colors to anchor the design. The right pairing depends on whether the goal is high contrast or a softer, layered look.
Dark countertops like honed black granite, soapstone, or matte black quartz create dramatic contrast. This combination works especially well in kitchens with ample natural light, where the dark surface grounds the space without feeling heavy. Edge profiles matter here, an eased or flat edge keeps the look modern, while an ogee edge leans traditional.
Neutral stone counters such as Carrara marble, quartzite, or light gray quartz blend seamlessly with cream cabinetry. Carrara’s gray veining pulls in cooler tones, while warmer beiges in quartzite echo the cabinet’s undertones. Expect $50–$100 per square foot installed for natural stone, depending on region and slab thickness.
Butcher block adds texture and warmth, particularly in farmhouse or cottage-style kitchens. Pair it with cream cabinets to avoid a matchy-matchy look with oak or maple tones. Butcher block requires regular oiling (food-safe mineral oil monthly) and isn’t ideal directly next to sinks or cooktops without proper sealing.
Wall colors should either contrast or layer in adjacent neutrals. Sage green, soft gray-blue, or warm taupe create depth without clashing. Avoid cool grays with yellow-toned cream, they’ll fight each other. Test samples in both morning and evening light before committing.
Hardware and Fixtures That Complement Cream Cabinetry
Brass and gold hardware bring warmth and pair naturally with cream’s yellow undertones. Unlacquered brass develops a patina over time, which suits traditional or eclectic kitchens. Brushed gold or champagne bronze offer a similar warmth with less maintenance.
Matte black hardware provides crisp contrast and reads modern or transitional depending on the cabinet door style. Use 3-inch or 5-inch center-to-center pulls on drawers and simple knobs or cup pulls on doors. Oversized hardware (6-inch or longer) can overwhelm cream cabinets unless the doors are at least 18 inches wide.
Polished nickel or chrome keeps the palette cool and clean, which works if countertops or backsplash lean gray. Avoid mixing metal finishes unless there’s a unifying element (e.g., brass cabinet pulls with a brass faucet and chrome appliances can clash).
Faucets and lighting fixtures should match or complement hardware finishes. A bridge-style faucet in brushed brass with matching cabinet pulls creates cohesion. If mixing metals, limit it to two finishes and repeat each at least twice in the space.
Design Styles That Work Beautifully with Cream Kitchen Cabinets
Cream cabinets adapt to a wide range of design styles depending on door profiles, hardware, and surrounding finishes.
Modern farmhouse pairs cream Shaker-style cabinets with open shelving, subway tile, and rustic wood accents. Add an apron-front sink, floating shelves in reclaimed wood, and black iron hardware. The look balances clean lines with warmth. Designers featured in 10 kitchens with cream cabinets often layer textures to avoid a flat, builder-grade feel.
Transitional blends traditional elements (like crown molding and raised-panel doors) with modern restraint (minimal ornamentation, simple hardware). Cream fits this category naturally. Use stacked upper cabinets to the ceiling, under-cabinet lighting, and quartz counters in soft grays or whites.
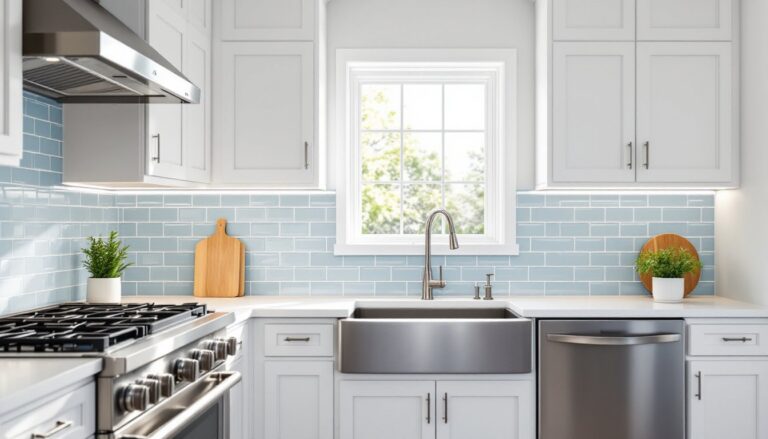
Coastal relies on cream cabinets with glass-front uppers, light wood floors, and blue or aqua accents. Skip heavy moldings in favor of beadboard panels or flat-front doors. Polished nickel hardware and white subway tile keep it fresh.
Traditional uses cream with more ornate details, dentil molding, corbels, and furniture-style islands. Pair with granite counters, oil-rubbed bronze hardware, and a decorative tile backsplash. This style benefits from layered lighting (pendants, undercabinet, and recessed) to avoid a dated look.
Scandinavian keeps cream cabinets minimal: flat-front doors, integrated pulls or handle-less designs, and pale wood floors. Add white walls, stainless steel appliances, and a single bold accent (like a matte black range hood). The focus is function and simplicity.
Backsplash Ideas to Enhance Your Cream Cabinet Kitchen
The backsplash bridges cabinets and countertops, so it’s an opportunity to introduce pattern, texture, or a pop of color.
White subway tile in a 3×6-inch size is the most common pairing. Use a contrasting grout (light gray or charcoal) to define the tile and add visual interest. Standard running bond is reliable, but a herringbone or vertical stack pattern adds personality without extra material cost.
Handmade or irregular tile in cream, white, or soft green brings texture. Zellige or terracotta tiles create an artisan feel. Expect $15–$40 per square foot for handmade tile plus installation. Seal terracotta or porous tiles with a penetrating sealer to prevent staining from splashes.
Patterned cement or encaustic tile works as an accent behind the range or along the full run. Stick to two or three colors that pull from counters, walls, or flooring to avoid a chaotic look. Cement tile requires sealing and periodic resealing (every 1-2 years) to maintain stain resistance.
Natural stone slab backsplash in marble or quartzite creates a seamless, high-end look. Use the same material as the countertop or choose a complementary stone. A slab backsplash eliminates grout lines, reducing cleaning time. Budget $80–$150 per square foot installed.
Glass tile or mirrored backsplash reflects light and makes small kitchens feel larger. Use neutral tones (ivory, soft gray) to keep the focus on the cabinets. Glass is easy to clean but shows water spots, so keep a microfiber cloth handy.
Lighting and Flooring Considerations for Cream Cabinet Spaces
Lighting temperature and flooring color directly affect how cream cabinets read in the space. Warm cream can look dingy under cool lighting, and too-similar flooring can flatten the design.
Lighting temperature should match the cabinet’s undertone. Cream with yellow undertones pairs best with 2700K to 3000K (warm white) bulbs. Cream with gray undertones tolerates 3000K to 3500K (neutral white). Avoid daylight bulbs (5000K+) unless the kitchen gets zero natural light, they’ll make cream look dull.
Install under-cabinet LED strips to illuminate counters and reduce shadows. Choose tape lights or puck lights with a dimmer to adjust intensity. Recess them slightly under the upper cabinets to hide the light source.
Pendant lighting over an island should hang 30–36 inches above the counter surface for task lighting without blocking sightlines. Use two or three smaller pendants instead of one large fixture to distribute light evenly. Match the finish to hardware and faucets.
Flooring in medium to dark tones grounds cream cabinets. Wide-plank oak, walnut, or hickory in a matte or satin finish avoids competing with the cabinets. Luxury vinyl plank (LVP) in wood-look finishes offers durability at $2–$7 per square foot and installs as a floating floor.
Avoid flooring that’s too similar in tone to the cabinets, cream cabinets over light maple or whitewashed floors can wash out. If the existing floor is light, add a runner or area rug in the prep zone to introduce contrast. Ceramic or porcelain tile in soft gray, charcoal, or terracotta also pairs well and handles spills better than wood.
Tips for Maintaining and Cleaning Cream Kitchen Cabinets
Cream cabinets show less grime than white, but they still need regular care to prevent yellowing and buildup around handles.
Routine cleaning should happen weekly. Use a damp microfiber cloth with a few drops of dish soap diluted in warm water. Wring out excess water, too much moisture can warp wood or loosen laminate. Wipe in the direction of the wood grain (if applicable), then dry immediately with a clean cloth.
Avoid abrasive cleaners, bleach, or ammonia-based products. These can strip finish or discolor painted surfaces. For tougher grease near the range, use a degreaser formulated for kitchen cabinets (e.g., Krud Kutter or Simple Green). Test in an inconspicuous spot first.
Prevent yellowing by minimizing exposure to heat and grease. Install a range hood that vents to the outside (minimum 400 CFM for a 30-inch range) to reduce airborne oils. Clean the hood filter monthly to maintain efficiency.
Painted cabinets may need touch-ups every few years. Keep a small amount of the original paint for this purpose. Lightly sand the damaged area with 220-grit sandpaper, wipe clean, then apply one or two thin coats. Feather the edges to blend.
For natural wood cream-stained cabinets, re-oil or rewax annually. Use a wood conditioner or furniture polish matched to the finish type. Avoid silicone-based polishes, which leave residue and can interfere with future refinishing.
Hardware maintenance involves removing pulls and knobs every few months and cleaning them separately in warm soapy water. Tighten loose screws to prevent wobble, which can enlarge screw holes over time. If a hole strips, fill it with a wood dowel and wood glue, then redrill once dry.