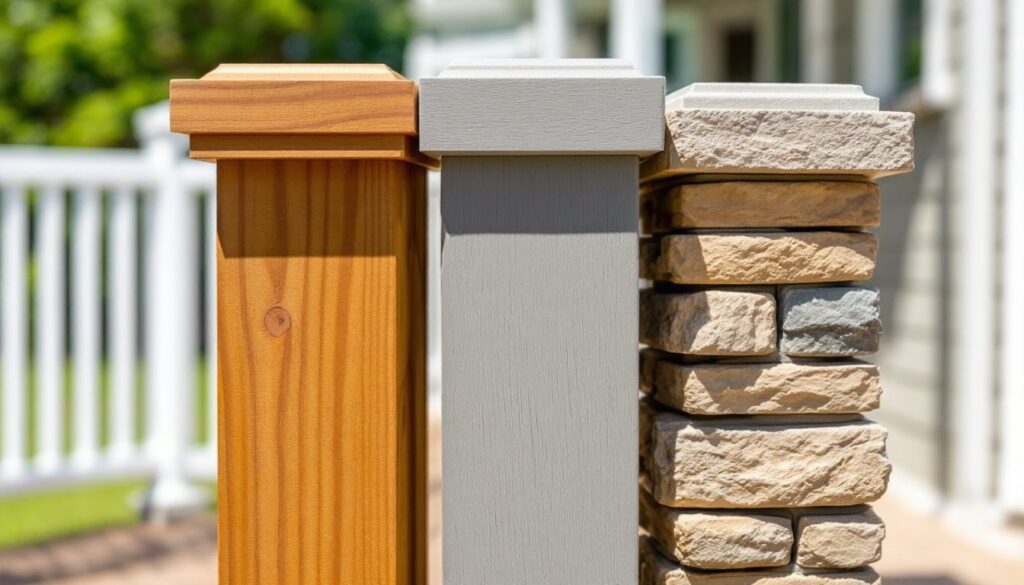
Exposed deck posts, usually pressure-treated 4x4s or 6x6s, do the job structurally, but they’re not winning any beauty contests. They weather, crack, and fade, and they scream “builder-grade.” Wrapping them changes the entire look of a deck, adds a layer of weather protection, and gives homeowners a chance to tie the deck design into the home’s architecture. Whether you’re looking for low-maintenance composite sleeves, rustic stone veneer, or budget-friendly DIY solutions, post wraps deliver impact without tearing down and rebuilding. This guide walks through the best options, what works where, and how to install them right.
Table of Contents
ToggleKey Takeaways
- Deck post wraps protect structural lumber from UV rays, moisture, and weather while unifying your deck’s visual design and extending post lifespan.
- Popular post wrap materials include budget-friendly wood ($1–5 per linear foot), low-maintenance composite and PVC sleeves ($40–80 per post), and rustic stone or brick veneer ($8–15 per square foot plus labor).
- DIY post wrap ideas like board-and-batten, horizontal siding, rope wrap, or paint-grade designs can deliver professional-looking results for under $20 per post.
- Proper installation requires measuring each face individually, allowing 1/8-inch gaps for expansion, using corrosion-resistant fasteners, and capping with a water-shedding top piece.
- Composite and PVC post wraps eliminate maintenance concerns with their durability, while wood wraps require restaining or resealing every 2–3 years to prevent checking and graying.
- Always check local building codes before wrapping posts that support roof loads or conceal structural elements; pulling a permit is recommended for major remodels.
Why Deck Post Wraps Matter for Your Outdoor Living Space
Deck posts take a beating. UV rays, rain, snow, and ground moisture cause splitting, warping, and rot, especially on posts that sit close to grade or in direct sun. Wrapping posts doesn’t just hide cosmetic damage: it shields the structural lumber from further degradation and extends the lifespan of the post.
Post wraps also unify the deck’s visual language. A deck with wrapped posts looks intentional and finished, especially when the wrap material matches or complements the decking, railing, or house siding. It’s one of the highest ROI cosmetic upgrades for outdoor spaces.
Finally, wraps simplify maintenance. Instead of sanding, staining, and sealing bare wood every few years, homeowners can wipe down composite or PVC sleeves or occasionally repoint stone veneer. For anyone tired of deck upkeep, wraps are a practical long-term play.
Classic Wood Post Wrap Designs
Wood post wraps bring warmth and traditional craftsmanship to a deck. The most common approach is building a four-sided sleeve using 1×6 or 1×8 boards (actual dimensions: 3/4″ x 5.5″ or 7.25″) around the existing post. Cedar, redwood, and pressure-treated pine are the go-to species.
Cedar and redwood offer natural rot resistance and a rich grain that weathers to silver-gray if left untreated. They’re ideal for craftsman-style homes or decks with wood railings. Expect to pay $3–$5 per linear foot for clear cedar boards, more for redwood depending on region.
Pressure-treated pine is the budget pick at roughly $1–$2 per linear foot. It requires staining or painting to match other materials, but it holds up well in wet climates. For a cleaner look, some DIYers add decorative trim, 1×4 corner boards or a routed cap rail, at the top and bottom of the sleeve to mimic column detailing.
Wood wraps do require maintenance. Plan to restain or reseal every 2–3 years depending on sun exposure. Skip the finish, and the wood will check and gray out, fine if that’s the aesthetic, but not ideal for painted wraps.
Low-Maintenance Composite and PVC Post Wraps
Composite and PVC post sleeves are the workhorse option for homeowners who want the look of wood without the upkeep. These are pre-fabricated sleeves, typically 4.5″ x 4.5″ interior for standard 4×4 posts (actual size 3.5″ x 3.5″) or 6″ x 6″ interior for 6×6 posts.
Most composite wraps are made from wood fiber and recycled plastic, offering a wood-grain texture and color stability. PVC sleeves are fully synthetic, resist moisture and insects better than composite, and won’t fade or stain. Both install over the existing post with no fasteners visible on the face, sleeves are shimmed snug, then capped with a matching top piece.
Colors range from white and tan to grays and browns. White PVC sleeves pair well with vinyl railings and colonial-style homes. Dark composite wraps in espresso or walnut tones suit modern or prairie-style architecture. Manufacturers like AZEK, TimberTech, and Deckorators offer kits that include base trim and post caps for a finished look.
Installation is straightforward but benefits from using composite materials that match the deck’s existing palette. Cost runs $40–$80 per post for a standard 8-foot sleeve, plus caps and trim. No painting, no sealing, just occasional cleaning with soap and water.
Stone and Brick Veneer Post Wraps for Rustic Appeal
Stone and brick veneer wraps add serious visual weight and work especially well on covered porches, pergola posts, or decks attached to homes with stone or masonry exteriors. These aren’t full masonry columns, they’re thin veneer panels (usually 1–2 inches thick) adhered to a substrate around the post.
The most common method: build a sleeve from 1/2-inch cement board or exterior-grade plywood around the post, then apply stacked stone panels, cultured stone, or thin brick using mortar or construction adhesive. Stacked stone in gray, tan, or ledgestone profiles is popular for mountain or rustic styles. Brick veneer suits colonial or farmhouse aesthetics.
Veneer is heavier than wood or composite, so posts must be structurally sound and properly footed. For decks close to grade, ensure the veneer doesn’t wick moisture from the ground, leave a small gap at the base or apply a waterproof membrane.
This isn’t a beginner project. Cutting stone with a wet saw, mixing mortar, and grouting joints takes practice. Many homeowners hire a mason for the install, especially for visible front-porch posts. Material cost is $8–$15 per square foot for veneer panels: labor can double that. Maintenance is minimal, repoint mortar joints every 5–10 years as needed.
Creative DIY Post Wrap Ideas on a Budget
Not every post wrap requires a big investment. DIYers with basic carpentry skills and leftover materials can build custom wraps that look high-end for a fraction of retail sleeve prices.
Board-and-batten style uses narrow vertical boards (1×2 or 1×3) over a flat base layer, creating a classic farmhouse look. Paint it white or a bold exterior color to match trim. Total cost: under $15 per post using pine or poplar.
Horizontal siding wraps mimic the home’s lap siding. Cut fiber cement siding or vinyl siding to length, miter the corners, and attach with trim screws or adhesive. This approach works especially well when the deck is attached to the house, it visually extends the siding down to the deck level.
Metal panels (corrugated steel, aluminum composite) deliver an industrial or modern vibe. Cut to size with tin snips, frame with wood trim, and secure with self-drilling screws. This works best on contemporary homes or outdoor kitchens with metal accents.
For a coastal or cottage aesthetic, consider rope wrap. Wrap natural or synthetic rope (1/2-inch diameter) tightly around the post using construction adhesive every few wraps. It’s affordable, textural, and pairs well with nautical or beachy decor. Seal natural rope with exterior polyurethane to prevent mildew.
Another simple fix: paint-grade wraps using 1×6 primed pine boards, caulked seams, and two coats of exterior acrylic paint. Add decorative molding at top and bottom for a column effect. Looks custom, costs around $20 per post.
Installation Tips for a Professional-Looking Finish
No matter the material, a few installation fundamentals separate a clean wrap from a sloppy one.
Measure twice, cut once. Posts aren’t always perfectly square or plumb. Measure each face individually and check for taper, especially on older decks. Use a speed square to mark cut lines and a miter saw for clean 45-degree corner joints if building wood sleeves.
Allow for expansion. Wood and composite both move with temperature and humidity. Leave a 1/8-inch gap at the bottom of the sleeve for drainage and air circulation. Don’t snug the wrap so tight it can’t breathe, trapped moisture leads to rot.
Use the right fasteners. For wood sleeves, galvanized or stainless-steel finish nails (18-gauge, 1.5-inch) work well. Predrill hardwoods like cedar to avoid splitting. For composite sleeves, most manufacturers recommend no face fasteners, sleeves should friction-fit or be secured with hidden brackets at the top and bottom. Some advanced framing techniques can also improve post stability during installation.
Cap it properly. A post cap sheds water and gives the wrap a finished look. PVC and composite kits include caps: for DIY wood wraps, cut a cap from 5/4 decking or 1x material with a 1-inch overhang on all sides. Seal the top edge with exterior caulk to keep water out.
Prime and paint before assembly. If building painted wood sleeves, prime all sides of each board before installation. Back-priming prevents moisture intrusion and reduces cupping. Caulk seams after assembly, then apply two finish coats.
Safety note: Wear safety glasses when cutting, work gloves when handling pressure-treated lumber or stone, and a dust mask when cutting composite or cement board. These materials produce fine dust that’s irritating to lungs and eyes.
For multi-story decks or posts supporting roof loads, consult local building codes. Some jurisdictions require that wraps not conceal structural defects or code violations. If you’re wrapping posts as part of a larger remodel, this might trigger an inspection. When in doubt, pull a permit, it’s cheap insurance. Many woodworking resources also offer detailed plans for decorative post wraps.
Conclusion
Deck post wraps turn an overlooked structural element into a design feature. Whether you choose the warmth of cedar, the convenience of composite, the gravitas of stone, or a creative DIY solution, the right wrap elevates the entire deck and protects posts from the elements. Measure carefully, pick materials that suit the home’s style and your maintenance tolerance, and don’t skip the details, tight joints, proper caps, and quality fasteners make the difference between a weekend project and a pro-level finish.