Building a deck with a ramp isn’t just about meeting accessibility needs, it’s about creating a seamless transition between indoor and outdoor living that works for everyone. Whether accommodating mobility aids, making life easier with a stroller or garden cart, or future-proofing a home, a well-designed ramp can blend into the deck’s aesthetic rather than looking tacked on. The challenge lies in balancing code requirements with visual appeal, choosing materials that match the deck, and integrating the ramp into the landscape so it feels intentional. This guide walks through ramp design styles, material choices, code compliance, and creative integration techniques for homeowners ready to tackle this project.
Table of Contents
ToggleKey Takeaways
- A well-designed deck with ramp ideas integrates accessibility with aesthetics by matching materials, maintaining consistent railings, and blending the structure into your landscape rather than making it look like an afterthought.
- Straight ramps work best for lower decks (under 30 inches) with ample yard space, while switchback and L-shaped ramps save space by using intermediate landings, making them ideal for tighter properties.
- ADA-compliant ramps require a strict 1:12 slope ratio, handrails on both sides for rises over 6 inches, level landings at least 60 inches long, and proper footings below the frost line to ensure safety and durability.
- Add traction to your ramp with adhesive grip tape, textured paint, or grooved decking boards perpendicular to travel direction, since smooth surfaces become hazardous when wet.
- Integrate your ramp creatively through strategic plantings, lighting in railings, skirting panels, multi-level seating areas, and pathway extensions that make the ramp feel like an intentional design feature rather than a utility.
- Beyond accessibility compliance, a deck ramp adds resale value, simplifies moving heavy items like grills and furniture, and provides practical benefits for families with young children and aging family members.
Why Add a Ramp to Your Deck?
Ramps serve practical purposes that go beyond accessibility compliance. They eliminate the barrier created by deck stairs, making outdoor spaces usable for anyone with mobility challenges, whether permanent or temporary. A broken leg, knee surgery, or aging parents visiting suddenly makes those three or four steps a real obstacle.
Beyond accessibility, ramps simplify moving heavy items like grills, planters, or furniture between the yard and deck. Homeowners with wheelbarrows, lawn equipment, or outdoor entertaining gear appreciate not having to wrestle things up stairs. For families with young children, ramps mean easier stroller access and safer navigation for wobbly toddlers.
From a resale perspective, accessible features add value. The aging-in-place market continues to grow, and buyers recognize the long-term utility of barrier-free outdoor access. Many home construction techniques now emphasize universal design principles from the start, and adding a ramp to an existing deck aligns with that trend. The key is designing it well so it enhances rather than detracts from the deck’s overall look.
Best Ramp Design Styles for Your Deck
Choosing the right ramp configuration depends on available space, deck height, and how the ramp will be used. The two most common styles each have distinct advantages.
Straight Ramp Designs
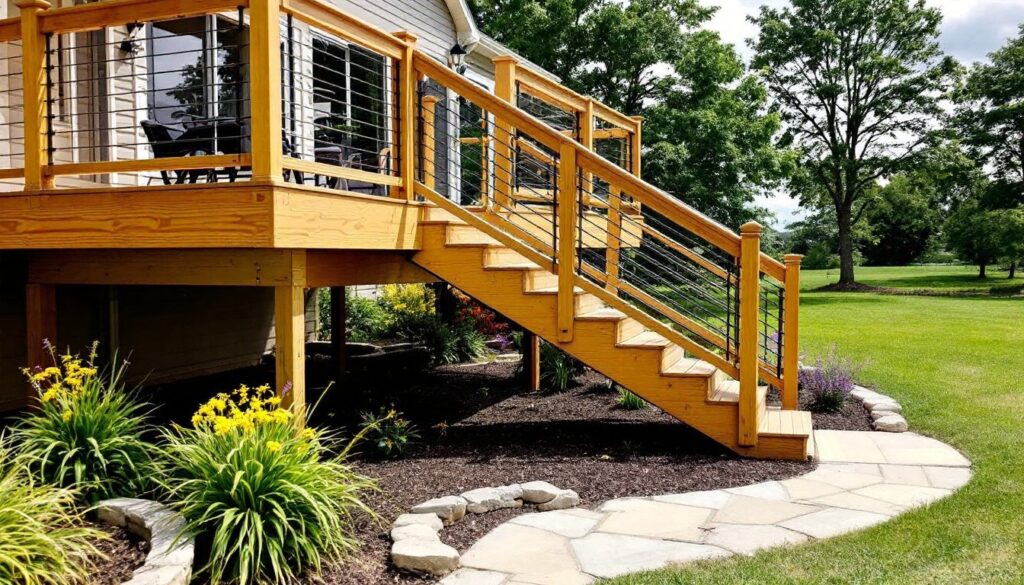
Straight ramps run in one continuous slope from deck to ground level. They work best for low decks, typically 30 inches or less in height, where the required run length won’t extend too far into the yard.
For ADA compliance, ramps need a 1:12 slope ratio (one inch of rise per 12 inches of run). A deck that’s 24 inches high requires a 24-foot straight ramp, plus level landings at top and bottom. That’s a significant footprint. For homeowners with ample yard space and a lower deck, straight ramps offer the simplest construction and cleanest sight lines.
Straight designs also cost less than switchback configurations since they require fewer turns, landings, and support posts. They’re ideal when the ramp can run parallel to the deck or extend into an open lawn area. Consider placing the ramp along the deck’s least-visible side if aesthetics are a concern, or embrace it as a design feature by using matching railings and decking materials.
Switchback and L-Shaped Ramps
Switchback (also called U-shaped) and L-shaped ramps use intermediate landings to change direction, significantly reducing the overall footprint. These designs work for higher decks or properties with limited yard space.
A switchback ramp reverses direction 180 degrees at a landing, creating a compact back-and-forth path. An L-shaped ramp makes a 90-degree turn. Both require level landings at least 60 inches long at each turn to accommodate wheelchairs and walkers safely.
These configurations add complexity and cost. Each landing needs proper support and framing, and more corners mean more cuts, railings, and potential for water pooling if drainage isn’t planned. But, they integrate better into tight landscapes and can follow the perimeter of the deck or wrap around existing landscaping features.
For a deck that’s 36 inches high, a switchback ramp might fold twice, keeping the entire structure within a 15-foot by 8-foot area instead of stretching 36 feet straight out. That’s a worthwhile trade-off for many homeowners, especially in urban or suburban lots where yard space is at a premium.
Materials and Finishes That Complement Your Deck
Material consistency between the deck and ramp creates visual cohesion, but it’s not the only option. Some homeowners deliberately contrast materials to define the ramp as a separate element.
If the deck is built with pressure-treated lumber, continue that for the ramp structure and decking. It’s cost-effective and holds up well in ground contact for support posts. Use treated 2×6 or 5/4×6 decking boards for the ramp surface, running perpendicular to the direction of travel for better traction.
For decks built with composite decking, extending that material to the ramp maintains a seamless look. Composite resists moisture and doesn’t require staining, which is especially useful for ramps since they’re lower to the ground and more exposed to splashing and debris. The upfront cost is higher, but maintenance time drops significantly.
Cedar or redwood ramps match naturally finished decks beautifully, though they require regular sealing to prevent weathering. These materials offer natural slip resistance when dry but can become slick when wet, consider adding abrasive strips or applying a textured deck stain.
Railing materials should match or complement the deck’s existing railings. If the deck has metal cable railings, carry that through to the ramp. If it’s traditional wood balusters, maintain that style. Mismatched railings make the ramp look like an afterthought.
Surface treatment matters for safety. Even smooth decking needs added traction on a sloped surface. Options include adhesive traction tape (3M makes a gritty version rated for outdoor use), textured deck paint with embedded grit, or grooved decking boards installed perpendicular to travel. Avoid any finish that becomes slippery when wet, skip smooth paints or high-gloss sealers.
Building Code Requirements and Safety Features
Ramps fall under both the International Residential Code (IRC) and Americans with Disabilities Act (ADA) guidelines, depending on whether the home is private or receives public access. For private residential decks, IRC is typically the governing standard, but many homeowners follow ADA guidelines for better usability.
Slope is non-negotiable. ADA requires 1:12 maximum (1 inch of rise per 12 inches of run). Some jurisdictions allow slightly steeper slopes for residential ramps, up to 1:10, but steeper means harder to navigate. Don’t cut corners here.
Ramps need handrails on both sides if the rise is greater than 6 inches. Handrails must be 34 to 38 inches high, measured from the ramp surface, and must extend 12 inches beyond the top and bottom of the ramp slope. That extension helps people transitioning on and off the ramp. Handrails need a graspable profile, typically 1.25 to 2 inches in diameter, so they can be securely held.
Landings are required at the top, bottom, and any point where the ramp changes direction. Landings must be at least 60 inches long in the direction of travel and as wide as the ramp itself (minimum 36 inches). These level areas allow wheelchair users to rest and maneuver safely.
Edge protection is often overlooked. If the ramp doesn’t have solid sides or a curb, consider adding a 2-inch curb or edge guard along the edges to prevent wheels from rolling off the side. This is especially important for switchback ramps where the edges face open air.
Permits may be required. Check with the local building department before starting. Many jurisdictions require permits for ramps, especially if they’re attached to the deck structure. An inspector will verify slope, handrail height, landing dimensions, and structural support. For DIY project plans that involve structural modifications, getting the permit process right from the start saves headaches later.
Footings and support must extend below the frost line in cold climates to prevent heaving. Ramps typically use 4×4 or 6×6 treated posts set in concrete, with 2×8 or 2×10 joists for the frame. Spacing follows standard deck joist tables, usually 16 inches on center for residential ramps. Don’t skimp on the structure: ramps take lateral forces from people bracing and turning.
Creative Ways to Blend Ramps into Your Landscape
A well-integrated ramp doesn’t look like an add-on. With thoughtful landscaping and design choices, it becomes a natural extension of the outdoor space.
Plantings along the ramp edges soften the structure and draw the eye away from the utilitarian function. Use low-maintenance perennials, ornamental grasses, or evergreen shrubs that won’t require constant trimming back. Keep plants at least 18 inches from the ramp edge to avoid encroaching on the travel path. Raised beds framed with treated lumber or stone can line the ramp, creating visual interest without added maintenance.
Lighting integrated into handrails or posts serves both safety and ambiance. Low-voltage LED strip lights under the handrail or recessed into ramp posts illuminate the path without glare. Solar post cap lights work for ramps that aren’t covered, though they’re less reliable in shaded areas. For projects that involve outdoor electrical work, reviewing repair and upgrade tutorials can clarify proper wiring techniques for exterior installations.
Lattice skirts or horizontal slat panels hide the underside of the ramp, making it look more finished and providing a visual anchor. Match the skirting material to the deck or house siding. Open lattice allows airflow to prevent moisture buildup under the ramp, while solid panels create storage space underneath for yard equipment or outdoor cushions.
Multi-level landings with seating turn necessary landings into functional outdoor spaces. A switchback ramp with a large landing midway can incorporate a built-in bench, planter box, or small bistro table. This makes the ramp feel less like a medical necessity and more like an intentional design feature.
Pathway extensions that continue from the ramp into the yard create a cohesive flow. Use pavers, gravel, or a concrete walkway that matches the ramp’s width, leading to garden beds, a fire pit, or a lawn area. This encourages people to view the ramp as part of the overall landscape circulation rather than an isolated element.
Paint or stain choices influence how much the ramp stands out. Matching the ramp finish to the deck makes it visually recede. Contrasting colors, like a dark stain on a light deck, can highlight the ramp as an architectural feature. Neutral tones like gray or taupe work with most house colors and blend into the landscape.